new works

Stained Glass Striped Fish

Striped fish in blue and yellow wispy glass
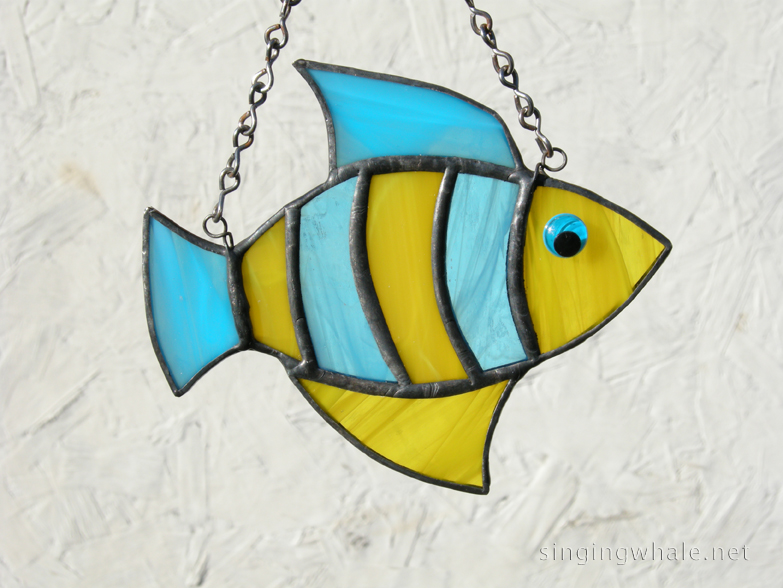
For one week each summer, I teach stained glass at a placed called ‘Camp’ Camp. It’s a great deal of fun to watch people who have never done stained glass before come in and make themselves something to take home (and Camp itself is just a blast in general). After this past summer (August 2013), one of my new students who is also an artist decided to start drawing some patterns and then sent me some to use. This striped fish is the first one of those I have made. I have great appreciation for KCJ’s willingness to share her ideas so I can offer more pieces.

What I love about this striped fish is its blend of realism and whimsy. It’s simple and yet has potential for so many color choices and textures. Measuring 4.75 inches wide by 4 inches tall, it’s perfect for any small window. In fact, you could get a whole school of them to fill up a larger window!

Visit the gallery to see the initial school of striped fish. You’ll find a blend of blues, green, yellow, purple orange… endless possibilities! Sometimes it can be a real challenge to come up with color combinations, especially for new patterns, but this one is easy. I am looking forward to seeing what other color and texture combinations I can use as well, and creating a whole ocean full of color.

Enjoy, and let me know what colors you would like to see!

Stained glass striped fish in three different color selections


Stained Glass Dragonflies

There’s no particular reason why I have not done stained glass dragonflies before, but I have gotten many requests for them. So I finally worked up a pattern and made my first samples this week.

pink dragonflyThe fun part about working up any new pieces is playing with glass colors and textures. I sat down to make one or two pieces, but when I started to pull out glass, I wound up with 10 by the time I was done. After consulting the all knowing Google Images to see the impressive variety of colors in which real dragonflies appear, it was easy to keep growing the pile of glass I could use. And I am already thinking of new glass to buy which can also make for beautiful new pieces!

A couple of months back, when I was picking up some other supplies at the glass shop I most often frequent (Detailed Stained Glass in Concord NH), I found that they also had a neat translucent white glass which just screamed “dragonfly wings”. It’s Spectrum’s  Firelight Krinkle (according to the sticker on the glass) for anyone curious. I started out with the plan to use that glass for wings. As I pulled more transparent colored glass for the bodies, though, the white seemed too strong, so I also looked at clear glass possibilities. Wound up using some clear glue chip, hammered, and clear satin textures.

red/orange stained glass dragonflyThe other aspect I was keen to explore was the notion of eyes. Because I’ve also started making cat faces (which will be covered in another post along with some other new patterns), I have been stocking up some smaller globs. I was most intrigued by the clear ones with either yellow or red cat’s eye style irises in them. Not all of the samples have eyes as I don’t have small globs in all colors. Decided to also do a few dragonflies with a ‘regular’ head, just to see how it would feel to cut those, and how the finished pieces would look. I like both styles!

The end result is a variety of glass colors and textures used to try out a couple of variations of the pattern for stained glass dragonflies. They are 6.25″ wide and 5.25″ long. Talk a walk through the stained glass dragonfly gallery and tell me – what do you think? I’m also happy to make custom dragonflies with the colors of your choice.

blue stained glass dragonfly

Mask and Quill stained glass, a Shakespeare Society icon

One of the very best things I got to do while a student at Wellesley College was to be a member of the Wellesley College Shakespeare Society. This is a small troupe of all women which produces and performs one of Shakespeare’s plays each semester. We play all the parts, in a delightful contradiction to Shakespeare’s day when men did the same. The bond we form as members is a lifetime thing, carried along and made stronger still by all who have come before and after.

Wellesley College Shakespeare Society Mask and QuillOur sort of de facto logo for the Society is a mask and quill. After making a more general Wellesley stained glass piece, I’ve been wanting to make one what would also represent Shakespeare Society. As you can see in this photo of a wooden plaque version of the icon, there’s some ornamental decoration along the outside edge that was giving me pause. After talking with some Shakers at a recent event at the House on campus, it was collectively agreed that the mask and quill itself was sufficient for a glass piece.

That’s all it takes to give me a new shiny thing, and I didn’t waste any time in starting to work on a pattern. In the end, it turned out to be a relatively uncomplicated pattern to make. The quill tip is in grey glass, and the feather of the quill is a perfect use for baroque glass. I polled a few Shakers for color, and both burgundy and a sort of gold were suggested. Since glass doesn’t really come in gold, and yellow felt too far ‘off’ to me, I also did a sample in light wispy amber glass. Seems a very good fit. The open eye and mouth are done in this samples with Clear Satin glass. Provides just a touch of texture to be more than ‘plain’ clear glass, but also still easily suggests the voids that are in all representations I have seen of the Mask and Quill.

Two representations of the Shakespeare Society icon of a mask and quill.

While this mask and quill stained glass piece was designed and made with a very specific group of people in mind, it could certainly appeal to any fans of the Bard, and of theater in general perhaps. Let me know what you think! They are $30 each plus shipping.

Addendum, June 19, 2013.
Had some requests for a couple of other colors in the masks, so made more. Am attaching a photo here to show more of the variety in which masks can be done. I am pleased that they are proving to be fairly popular!

purpleredblue

Rainbow Stained Glass

Inspiration comes from the darndest places, sometimes. I was looking at a page of rainbow, equality, and tolerance bumper stickers recently, when one of them really caught my eye. Decided to use it as a starting point to design a rainbow stained glass piece, using the rainbow to be the equality bars in the piece. That, in turn, led to an alternate rainbow stained glass piece also for equality, but in reverse, with the rainbow colors surrounding two clear glass bars to represent equality.

Rainbow equality stained glassI did a little tweaking on the first pattern. My initial effort was a little too small to be practical, and didn’t look as balanced as I had hoped it could be. Things look a lot different on paper than when they are rendered in glass! I have a tendency to start small and then wind up having to make it bigger. Same thing happened when I made my pattern for the rainbow peace sign, also inspired by something similar I saw on line. I am happy with the second run on this pattern, with borders of equal width, also matching the clear bar in the center. I went with clear glass rather than any color, including white, because I really wanted the rainbow colors to stand on their own. I did use a textured clear glass to give it a touch more depth. The final piece measures 5″ by 7″. Because the red pieces on the ends get sort of short shrift in real estate compared to the others, future constructions of this could easily have a ‘color shift’, where red is one of the main stripes and some other color winds up a little smaller in the shifting of the rainbow.

Rainbow equality stained glassAfter getting some feedback on the first test piece (not the one pictured above), there was a suggestion to reverse the equality effect, so that led to this second pattern, which I call reverse equality (I know, not terribly clever, but it’s descriptive). I did this one two very slightly different ways. In one, the right and left full length pieces are all one piece. In the other, I broke those up in to three. Was a little unsure about stability the first way, and I also sort of liked how the break lines looked on paper in the second one. I am satisfied with both and would make both again. I think I like the one with the end pieces cut in three slightly better than the other, but that’s definitely just a personal preference more than anything else. Measuring 5 1/4″ by 6 1/4″, both versions are solid and stable.


Equality rainbow stained glassSo, what do you think?

Stained Glass Ornaments: Red Birds

When I started making cardinals in stained glass in late 2011, my friend, Tracey, asked about stained glass ornaments of red birds. I did not have any at the time and was not able to work on any new patterns before Christmas. Wasting little time, I wanted to get started early on them for this year.

I based these also on the same cardinal photo I used to create the pattern for the cardinals in stained glass. My intention was to make a fairly simple pattern, just a few pieces of glass, so they could made fairly quickly and easily. I am very curious if people like them.

Stained glass ornaments - red birdsIn the end, I wound up with three  sizes, which you can see illustrated in the gallery. The largest seems too large to function as an ornament but would make a lovely suncatcher in a smaller window. I used a different glass on this one than the other two, a brighter red that’s more translucent than transparent. The other two samples were done in red waterglass, which looks lovely in a window with light coming behind, but probably would be too dark to hang on a tree. So, ornaments would likely get made in the brighter red going forward. I also did each in a different patina for variety, with black on the largest, copper for the middle sized, and silver on the smallest. I need to get matching chain and ribbon for copper patina, a finish I actually hadn’t done on anything for a while. Time to stock up! I’d also used a darker brown glass for the beaks on these, and would use the solid black glass going forward.

Thanks for looking, check out more photos in the gallery, enjoy, and please do let me know what you think!

Stained Glass Single Tulip Suncatchers

Switching from fauna to flora for this one. My friend, Jen, is an amazing woman with a remarkable new local business called the Elf Shelf. She makes custom gift basket arrangements, and delivers them with her son, Nick, a terrific young man with numerous disabilities and also the most amazing ability to make anyone smile. Jen loves tulips, and she’s just inspiring with how she brings so much energy to everything she does, so I decided to make her a stained glass tulip.

Single red tulip bulb in stained glassI just wanted to do something very simple since I wasn’t sure what sort of window space she would have for a piece. I found a pattern on line with several tulips, and I downloaded that, making some edits and adjustments to create a single tulip bulb with a couple of leaves. Used red waterglass for the tulip itself, black patina on the seams, and it turned out nicely. Luckily, Jen loved it!

Large tulip, using all wispy glass.The more I looked at the tulip, though, the more I realized that, to me,  a tulip has a longer, more tapered body. So off I went to find a good photo of a single tulip bulb, and then work that into a pattern. I still wanted to keep the finished pieces fairly simple and wound up doing two sizes, to see what would work best. And because I don’t do anything without going whole hog, I made three samples in each size, with red, yellow and purple glass for the flowers, and various greens for the leaves. There’s a gallery of stained glass flowers works in progress now, as well, if you would like to see what I made.

What do you think? Different colors, different sizes? I think I am partial to the one with purple waterglass. What flowers should I try next?

Large tulip, using a purple swirl waterglass for the bulb.

Stained Glass Hummingbirds, January 2013

Late last fall, I was asked to make a stained glass cardinal. There are scads of free, and very good, cardinal patterns on line and I downloaded several of them. And then I thought, I have a few pretty good cardinal photos. Let’s see if I can make my own pattern. I did, then made a tweak, and wound up making many which were bought for Christmas/holiday gifts. I’ll cover cardinals again soon in relation to ornament versions  I am also working on.

This all leads up to today’s post. Inspired by the successful cardinal pattern, I decided to go through other bird photos to see what other patterns of my own I could make. I started with hummingbirds. I’ve seen many stained glass hummingbirds on line, in a very impressive array of settings. I am leaning towards the more simple here. I think simple can be equally beautiful. I also had a fair bit of black/grey baroque glass left from making a raven, and thought it would work well to imply the fast beating wings.

As you will see in the album that goes along with this post, I picked two images, and created three patterns. I can already see tweaks I want to make in the patterns. I’ll make the belly part one piece going forward, to avoid a random seam in the middle of the body. On the side view hummers, I’ll do a better curve at the bottom of the belly. I have included the original photos on which the patterns were based, in case anyone is curious. I could do a female version of the front facing hummer, as well. Might have to play with that idea a little. For the beak, because these are not large pieces overall, I have opted for 14 gauge wire. All of the pieces here are finished in black patina. The chain is just a 3 inch length so that the bird does not sit right on top of a suction cup or hook.

I’m hopeful that people will like these as I know hummingbirds are very popular. They have such an interesting variety of colors, too, equaling a wide array of glass options. Please let me know what you think. Thanks!