new works

Mixed Media Wreaths – stained glass and chain/scale maille

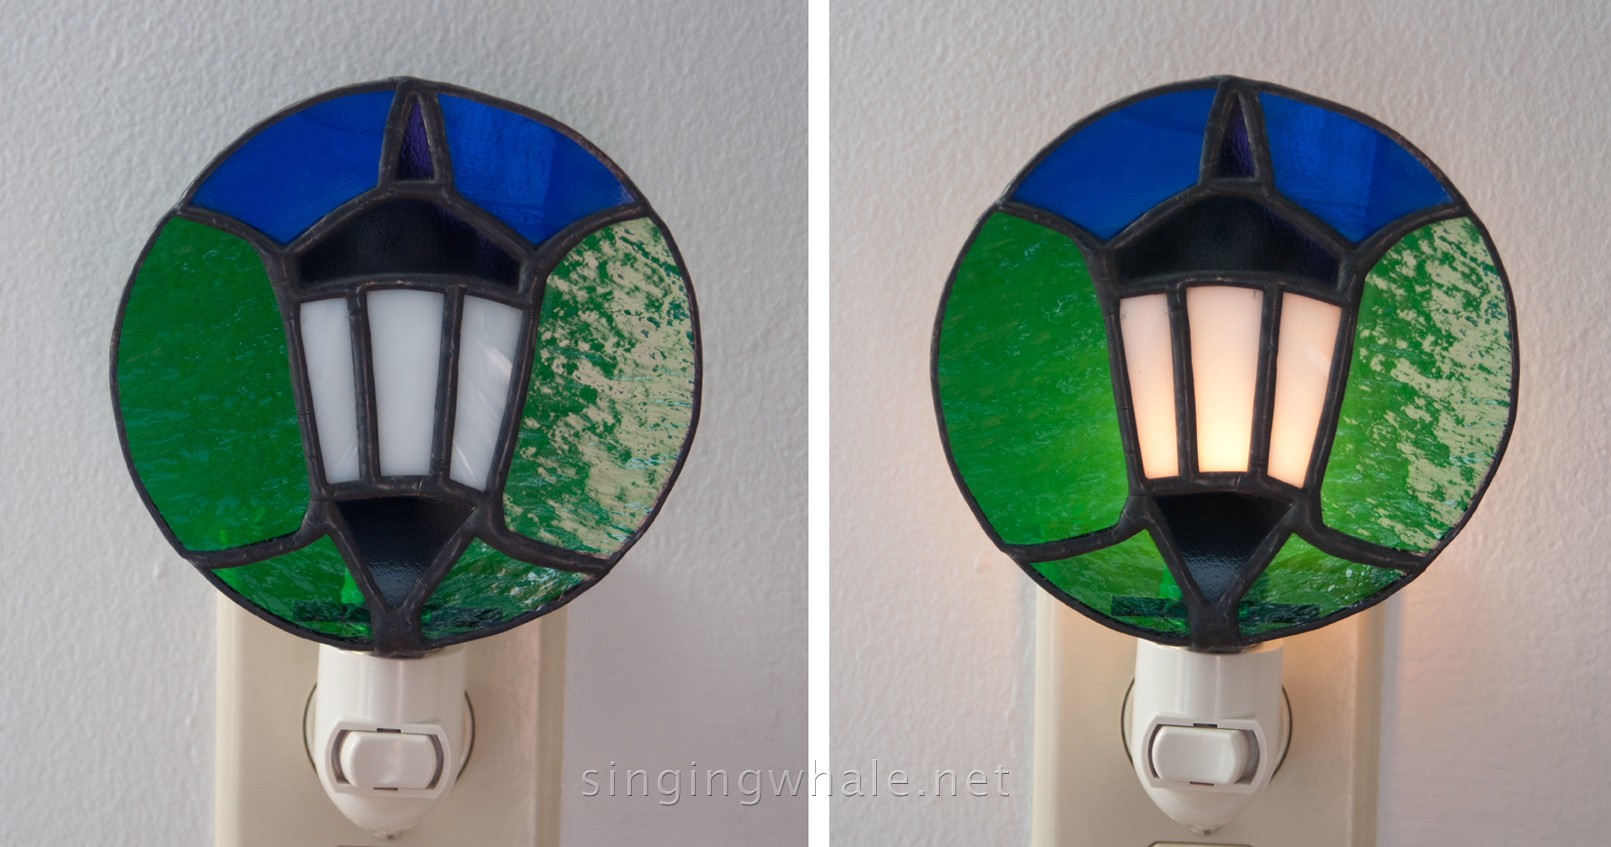
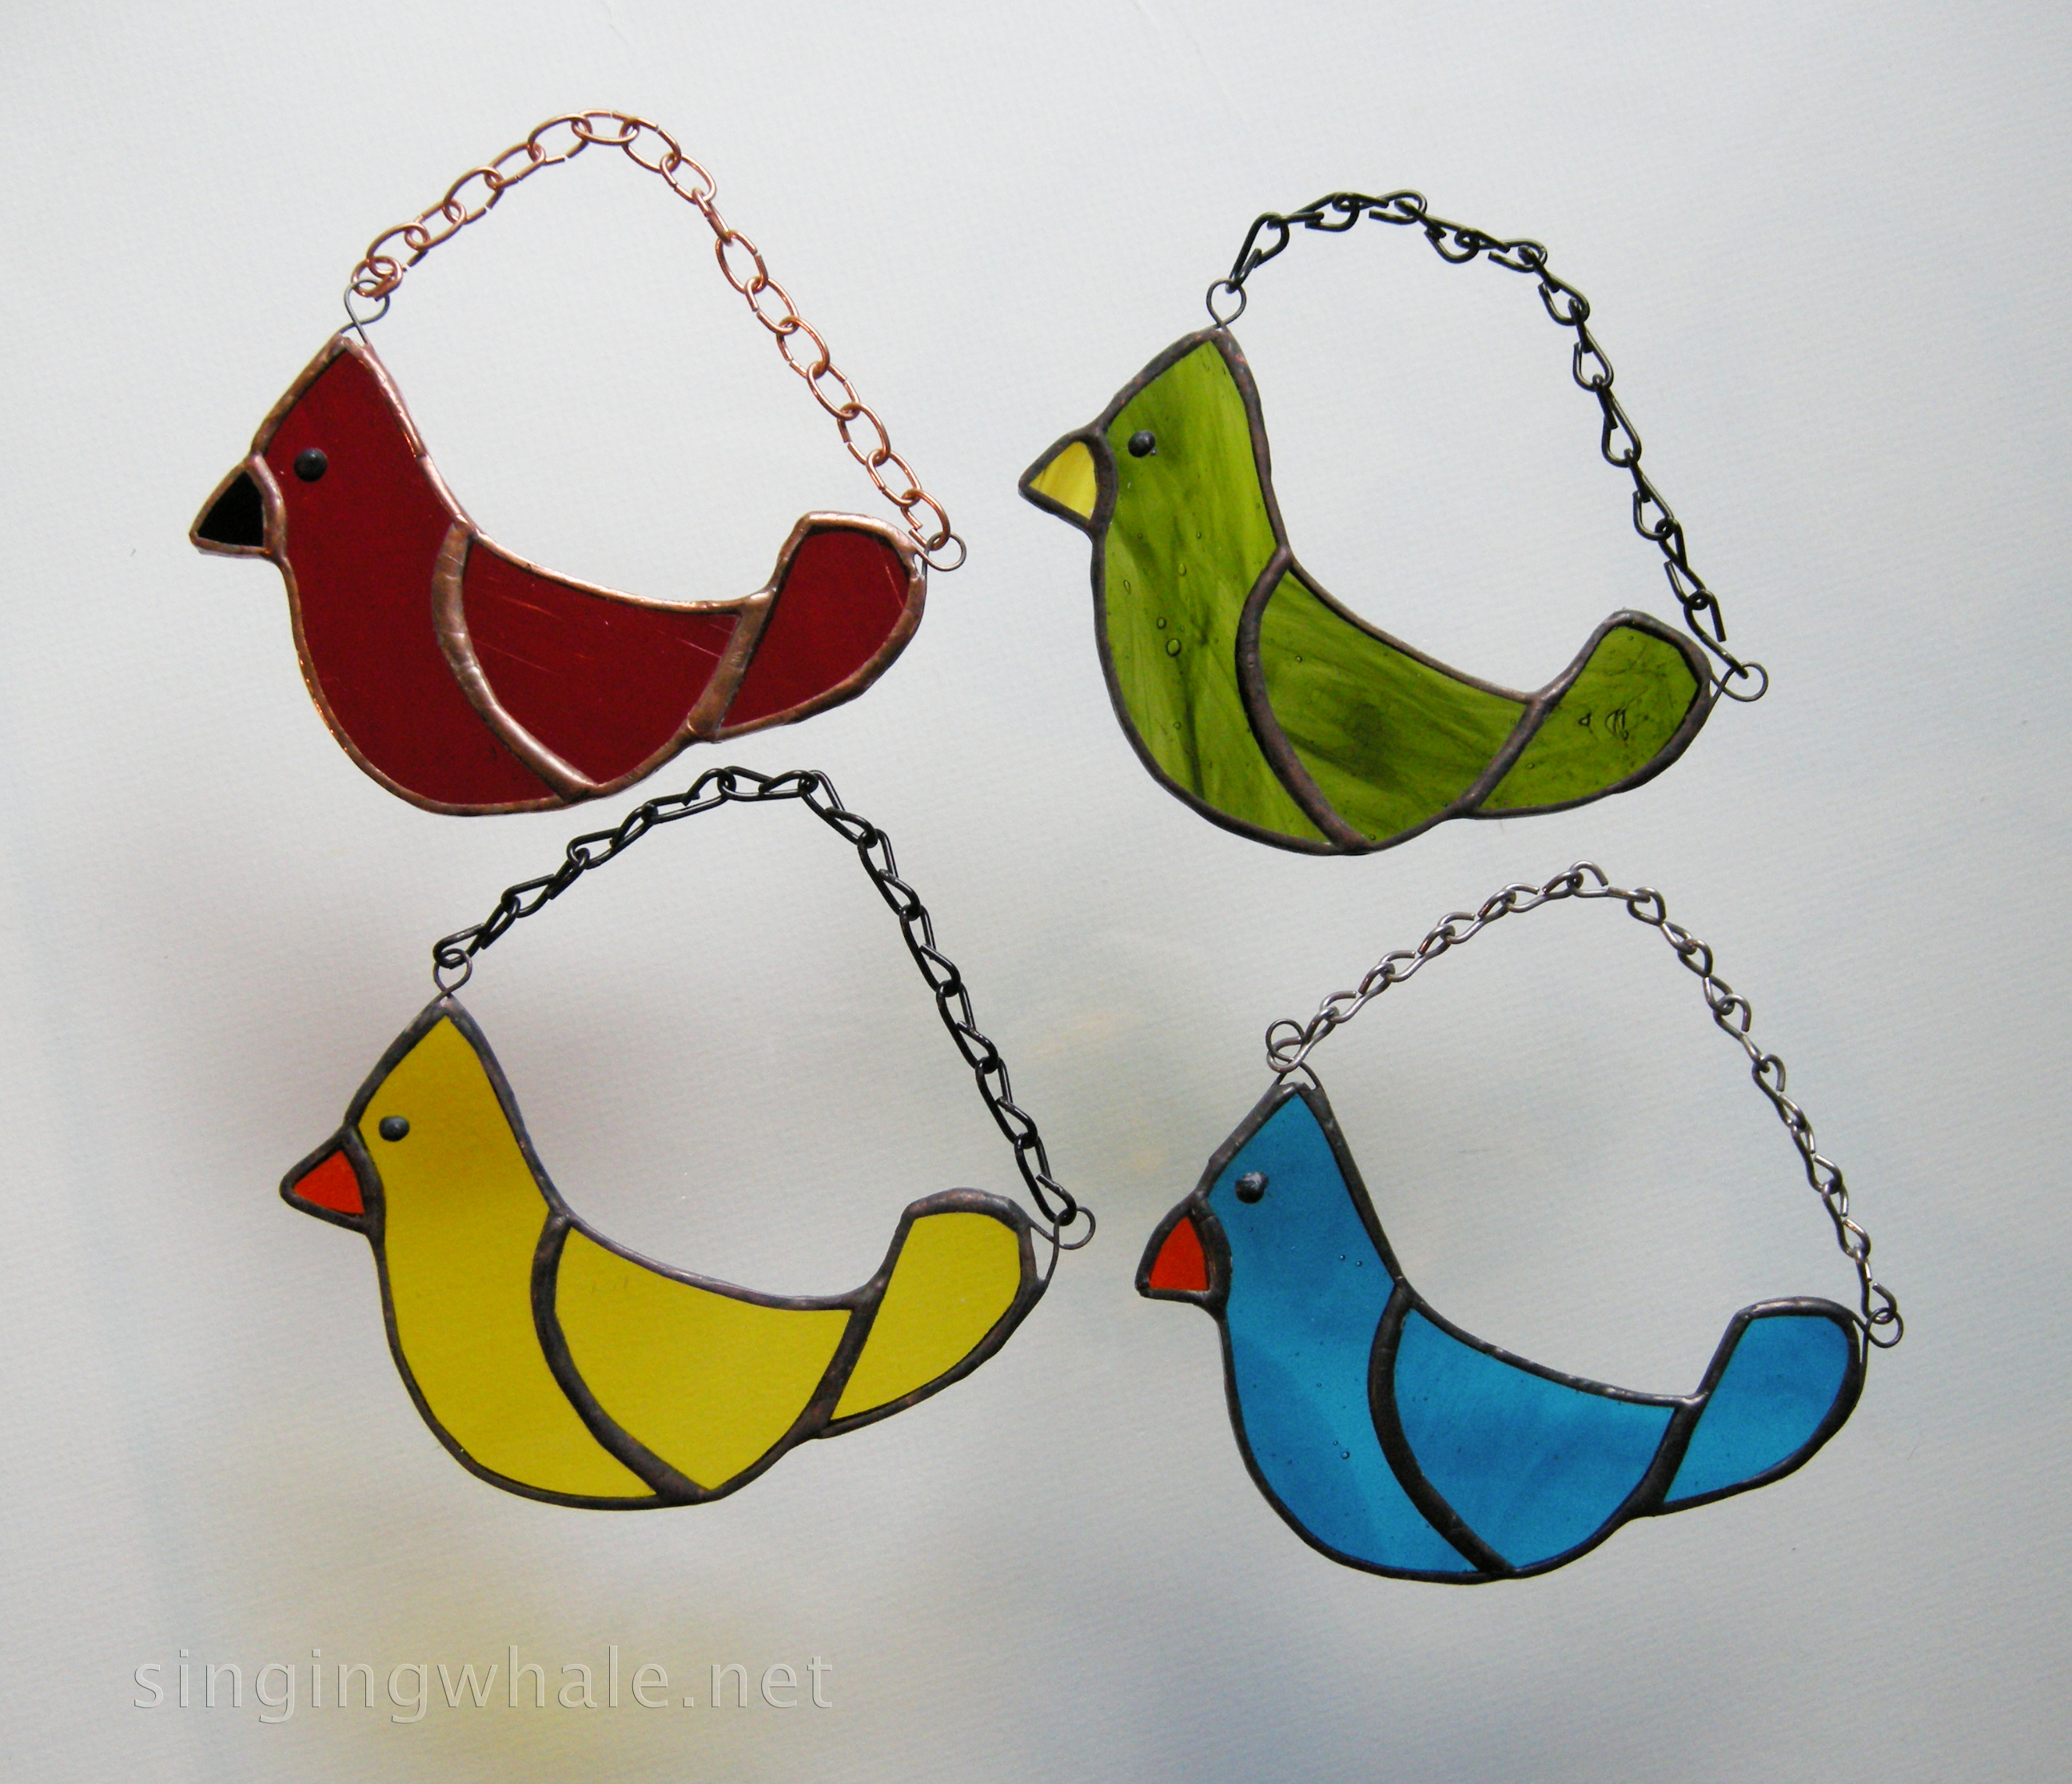
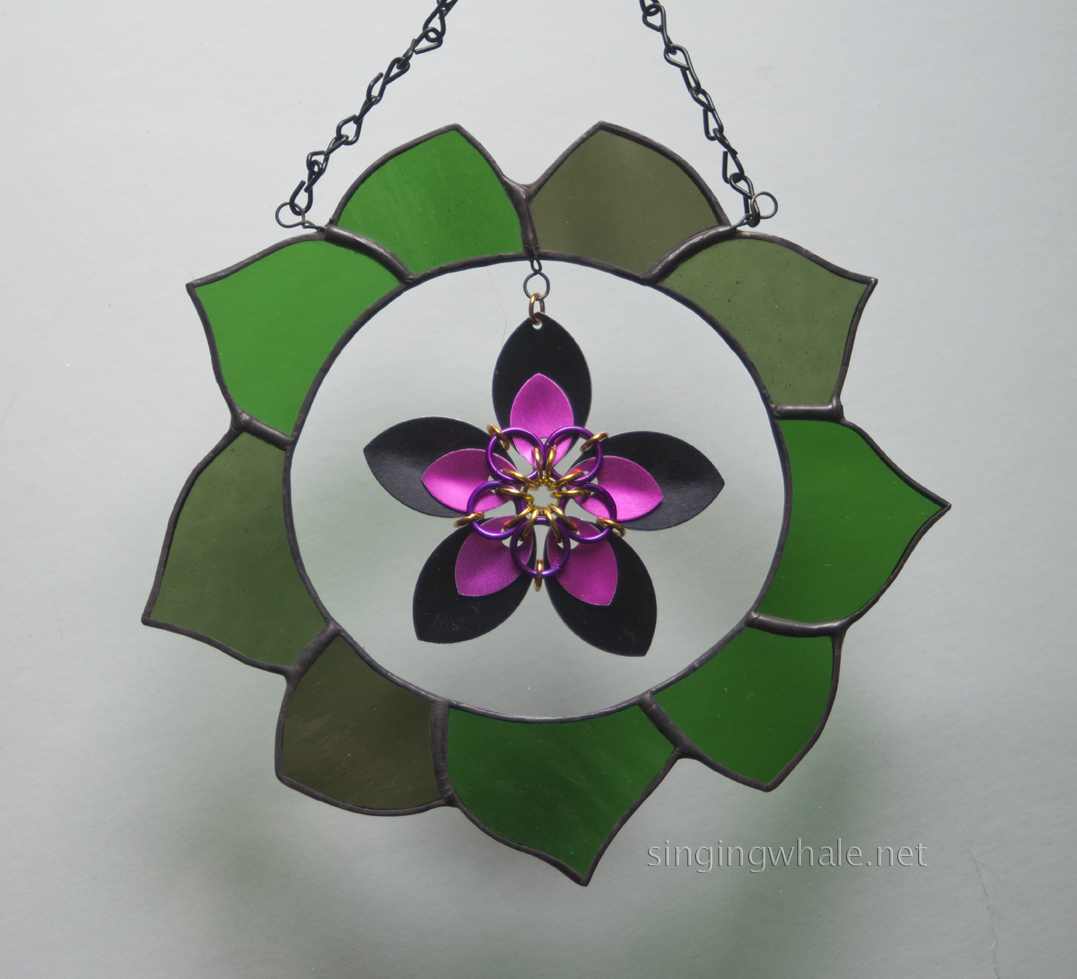
I am delighted to finally offer the first of hopefully numerous mixed media projects where I combine stained glass with chain maille and scale maille!

scale maille flowersA little background… Every summer I spend a week in Maine at a fantastic place called ‘Camp’ Camp. It’s a camp for LGBT adults, and I’ve been going since 2008. I actually teach stained glass while there. Happily, I also get to enjoy other offerings during the week. For the last few years, I’ve taken chain maille classes from my friend, Jason. He’s passionate and patient and has created a lot of new maillers as a result of his excellent class. It was not long after returning home the first year I got to try it out that I started digging into that form more deeply, discovering far more than the word of jewelry and other wearables (though I have been making a lot of bracelets and other things to practice). Wheels started turning about how I could combine glass and maille, to make some new and hopefully exciting, enticing things.

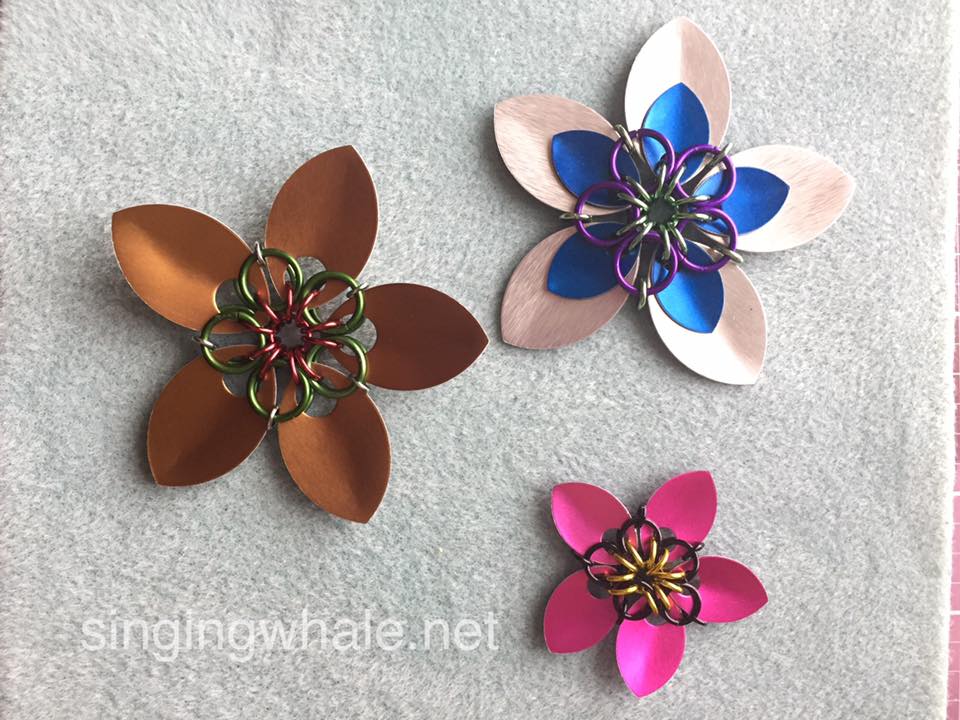
Last week, I pulled up some photos I had taken of leaves a few years ago when walking around Lake Waban at Wellesley College, and created a wreath pattern to make in glass. Meanwhile, I received some supplies and the flower tutorial from The Ring Lord for ways to fill that wreath. Then it was just a matter of making both elements, and making them work together.

Stained glass wreath scale maille flowerJust in time for Mother’s Day, or even just to have something new and different in your window, I am delighted to release this line of flowers that will never wilt, never need watering!

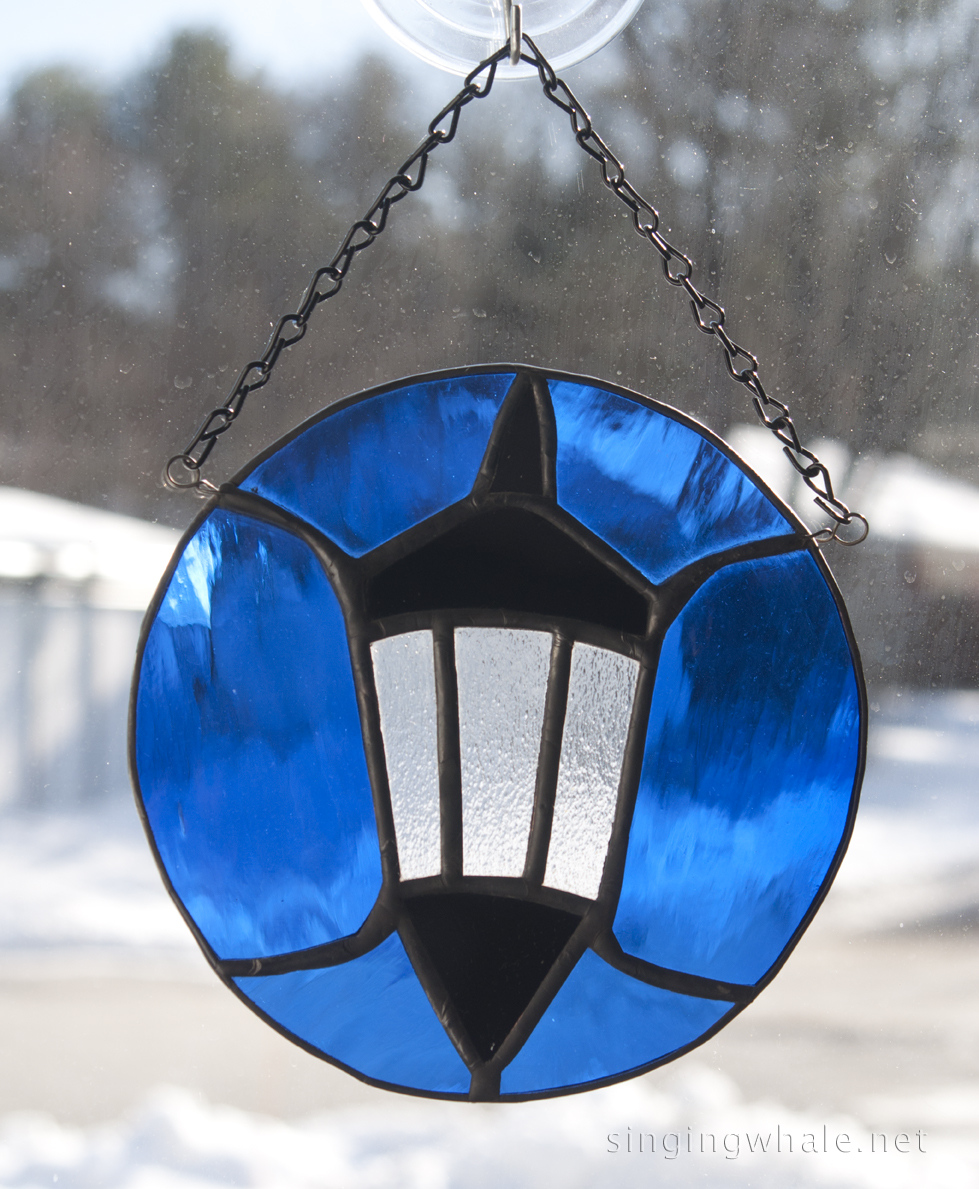
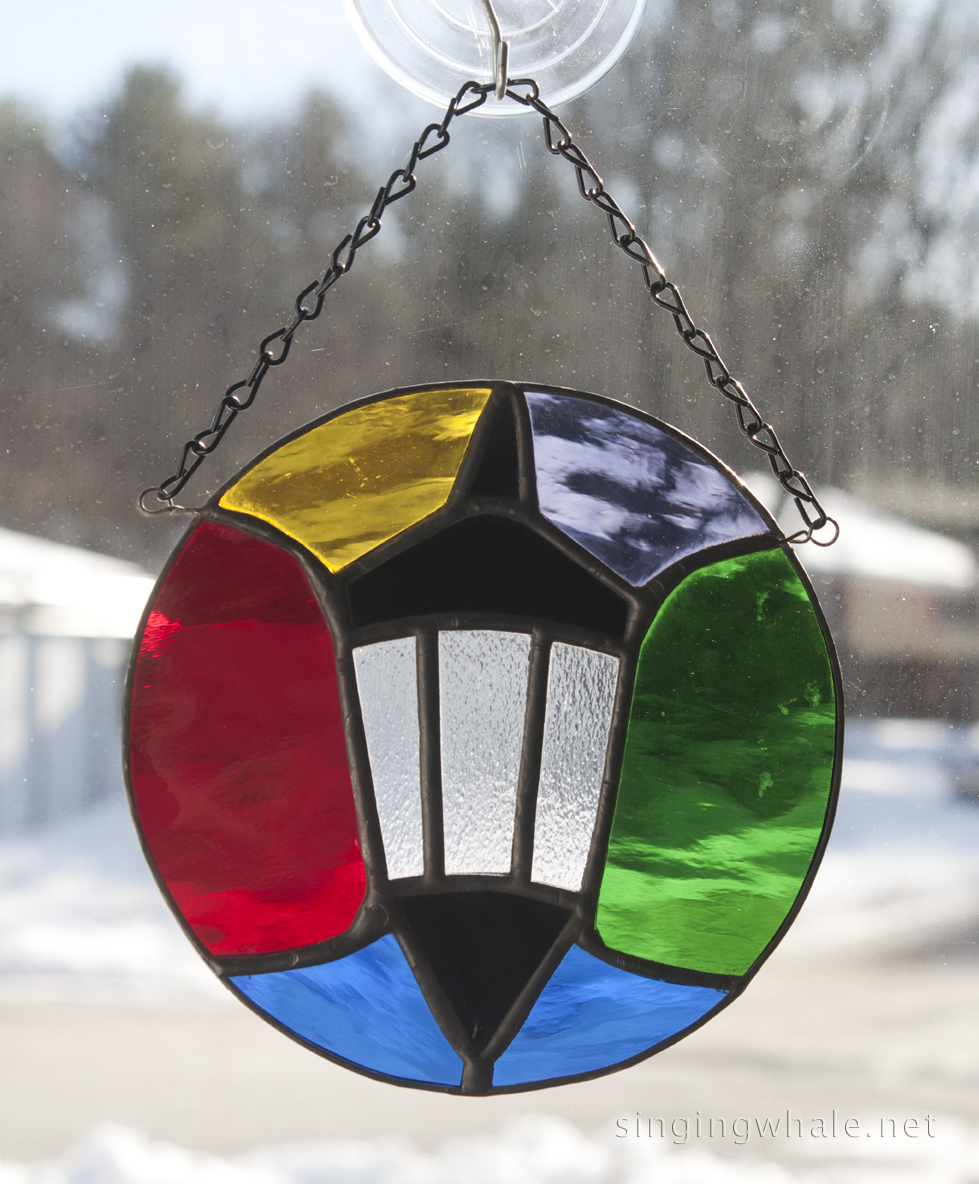
There are two sizes available, at about 7″ wide ($45 each, plus shipping) and about 5″ wide ($35 each, plus shipping). Specific details are included with each photo. Each flower right now is different, and I utilized a variety of different green and clear glass options to make the wreaths for each one. The only way to know how they will each look is to make them! Clear glue chip already offers a really cool natural look, with the appearance of leaves, twigs, etc ’embedded’ in the glass. And Pilkington makes a clear glass called Autumn that has the texture and shape of leaves in it. I really like how it looks on the larger wreath. Clear glue chip works great for both sizes of wreaths.

Please enjoy the photos below, visit the Etsy shop if you’d like to put one of these in YOUR window (or your mom’s!) and let me know what you think. I will be happy to customize flowers and glass for future versions of these, if people have specific desires along those lines. Thanks!

Stained Glass Wellesley College Lamp Icon – nightlight and suncatcher

We’re just a few weeks into 2016, and I am trying to hit the ground running. I have a lot of ideas I am hoping to bring to fruition this year. Watch this space!

Wellesley College - Galen Stone Tower and iconic lamp with post. Photo by Amy J. Putnam '90To get things started, I made a nightlight of one of my favorite icons, the lamp at Wellesley College, my alma mater. I am very lucky and privileged to have gone to school there as it’s an amazing place that has graduated many amazing human beings since 1875. It’s humbling to be amongst those folks.

We have several icons and images which are indelibly Wellesley, including a lamp post that is found all over the campus. Frequently, one might see representations of the lamp and post together, as seen in the photo here (along with one of our other icons, Galen Stone Tower). But, I haven’t been able to find a good way to do the post’s curl without ‘interrupting’ it with other seams and break lines to get the curve in there properly. So I decided to forge forward with the lamp alone.

When shopping for this piece, my goal was to find the right glass for the panes of the lamp. I really dislike seeing the light bulb behind any nightlight, so the intention is to get something that shows the light, just translucent enough. I found success with this white glass seen in the first pieces, below, and I love how the lamp just glows in front of the light.

For the round background, the school’s color is a deep blue. Each class is also assigned a color, one of four which rotates as a class graduates and new one arrives: purple, yellow, green, and red (I’m a purple class. Simply mauvelous). We also have students and alums who have attended outside of traditional college years. Because their studies often encompass more than the usual 4 years of a bachelor’s degree, they are represented by all four colors. So in making the first samples of this pattern, I did a variety of combinations to show blue with class colors either singly, or showing all four. And this certainly does not exhaust possibilities, as background can easily be all one color.

After some hemming and hawing about how to pull this off, I am pleased with the end result. Scroll down to see more about a suncatcher version of this piece.

The glass of the night light is 4 1/8″ in diameter. The length, with the nightlight works, is 5 1/2″. They are $40 each plus shipping.

Orders can be placed through the made to order listing in my Etsy shop. Contact me here or there with any questions. Thanks!


fourcolors-lr greenlight-lr
purplelight-lr redlight-lr


EDITED TO ADD:

Now there is a suncatcher, too! The pattern is essentially the same, but the overall piece is larger, coming in at 5 3/8″ in diameter. I’ve made four initial samples in that as well, pictured below. So if you don’t have need of a nightlight but would like a piece of Wellesley in your window, this lamp suncatcher could well fit the bill! They are $30 each, and I have also created a made to order listing on Etsy for these. Hanging chain is included with each one.

As with the nightlights, there is a wide range of possibilities for color layouts, with just a few seen here. Unlike the nightlights, there is a choice between two glass types for the panes of the lamp itself. I can do it in white, or in clear satin, a textured glass, which allows more natural light through. The all blue and multicolored suncatchers below have the clear satin in the lamp, while the green/blue, and all yellow versions have white glass.

allblue-sun multi-sun
greenblue-sun yellow-sun

Stained Glass Yellow Rubber Ducky

Even though I haven’t posted anything for a while, I’ve been keeping busy. I have several new patterns in development as well, but I wanted to end the silence by first posting about this stained glass yellow rubber ducky that I made in late July. I could not post about it until now because it was a gift for a friend whose baby just arrived a short while ago (congrats, Kat and Justin!). The ducky was commissioned by Kat’s mom, as the nursery was decorated in yellow ducks.

4duckyI went around on line to look at various patterns available, and wasn’t thrilled with any of them. The shape of the duck makes it bottom-heavy by default, and I wanted to make sure I constructed one which was not going to separate as a result. I didn’t really want to do a panel-type of piece, ducky and background, just a ducky.

Luckily, I had a rubber ducky of my own, in ‘electric blue’ I call it. So I grabbed my camera and took a bunch of photos. I wound up using a composite of two photos to get the side wings and angle of the head, allowing for good seams in which I could add hooks for chain, and also giving the piece a bit of personality.

I am pretty happy with the result, and Jill (Kat’s mom) was as well. If Kat and Justin ever catch up on sleep, I’ll get their reactions, too. So far, I have made just the one ducky, in the traditional yellow, but it can certainly be made in other colors, too. The piece measures approximately 6 1/2″ wide and about 7″ long. I have black jack chain on this one for hanging. I used a fairly dense but still translucent yellow and white wispy glass for the body which just glows when the sun is behind it. The beak is an orange wispy glass. Cost is $30 each.

7rubberduckyglass-Putnam 2rubberduckyglass-Putnam

What do you think of it?

Stained Glass Sailboats

It has long been in my mind to create a pattern for stained glass sailboats. Many people love boats, love the water, and boats are a popular image and collectible. After sketching out some ideas for my own sailboat pattern, I also spent a few days looking at countless images of other stained glass sailboats, boats on the water, sails and sail colors. I wanted my pattern(s) to be unique and yet also easily recognizable.

Stained glass sailboat after being cut and foiled.After all of that research, I opened up a new file in photoshop and started using the tools to create a neat pattern (ie better than my poorly hand drawn start up). After getting one to my satisfaction, I opted to modify it a little to allow for more color possibilities. The results are a pattern with a couple of stripes, and a pattern with more stripes.

I made four initial samples, two in each pattern version. I am hoping these sailboats will resonate with anyone who enjoys being out on the water and wants a reminder of that in their own windows. The resulting pieces came out pretty well, I believe, though I may tweak the multiple stripe pattern a little. If I do, updated photos will be added here and to the sailboats album.

The finished pieces are the same size regardless of pattern. They measure about 5.5″ across by 5.25″ long. Pricing will be $30 for the pattern with the paired stripes, and $35 for the multi-stripe pattern. Shipping is extra. Hanging chain and suction cups are included. I love that the color possibilities are pretty much unlimited with both patterns. I have a feeling I will be spending a lot more time looking at photos of sails to get more ideas!

I invite your feedback, and your orders. Thanks for reading! Check out the sailboats gallery for more photos.


Stained glass sailboat with two stripe sail. $30 plus shipping. Stained glass sailboat with multi stripe sail. $35 plus shipping.


Stained Glass Butterfly Ornaments

Lots of new little butterflies awaiting construction.Up here in the northeast region of the United States, it’s been a particularly long and brutal winter. Cold has been ceaselessly relentless, and the snow depth has reached record levels in some places. After a while, cabin fever and dreams of spring become completely dominating. This year, that meant I started thinking about new, bright pieces to bring back some color. My thoughts turned to the butterfly, and I decided to make up patterns and pieces for stained glass butterfly ornaments.

I am doing a brand new event on March 21, Zing into Spring event in New London NH, created by Kearsarge Magazine, so I have been working on making some glass for that day (in addition to many glass hearts!). I started thinking about butterflies which could be a little smaller, both in terms of piece size and to have a less expensive take away item. I started fiddling around with drawing butterfly wings in photoshop, consulting the almighty Google image search to look at actual butterfly wings for comparison and inspiration. After a little trial and error, new lines and lots of erasing, I landed on a pattern.

Red/orange/yellow butterfly cut and foiled, about to be soldered together.Because I don’t do any new pattern simply, as usual it was not enough to make just one or two to start. I went through my scrap glass collection (as well as a little of the regular glass stock) and wound up with 18 new little butterflies.

The end result is a lovely stained glass butterfly ornament for any window, or even on a Christmas tree at that time of year. It measures 3.25″ across and 2.75″ high. A hanging hook is securely attached so that the butterfly hangs on an angle. They are made with the copper foil method, and the seams are finished with black patina. The color combinations are practically limitless and I think this is going to be a fun piece to make. I am offering them for $10 each, plus postage where applicable (ie not at a show). I’ve posted a gallery of the first butterfly ornaments to show some of the potential ranges. Please feel free to contact me with any questions or special color requests. After the Zing into Spring event, I expect I will be putting some of these up on Etsy as well.

And if you are free on March 21 and able to get to New London NH, please stop by Zing into Spring. There is a lot of great stuff in store with vendors, classes, demonstrations, and more!

purplewispy wispypink yellow-redamber

Stained Glass Hearts

After a wonderfully busy holiday season, my mind started to turn towards thinking about what next to add to my catalog to start off 2015. With Valentine’s Day, on the near horizon, I started contemplating stained glass hearts and roses.

Roses may still yet come once I get some photos from which I can play with making patterns. Hearts, on the other hand, were easy to get started right on my computer. First, I spent a full day looking at other stained glass hearts on the internet to see how other people were rendering them. My goal is always to be mindful of other people’s work so that I can create something that is more my own, unique and different from other work out there.

Stained glass heart in a patchwork pattern, made with cool colorsAnd because I am not one to do a simple ‘one pattern, one sample’ approach, by the time I was finished playing around with patterns and ideas, I had 5 patterns to try out (and a couple more which are still simmering…). Then I went to pull out some glass to make samples, and those 5 patterns turned into 9 samples. This also, with some of the patterns, resulted in an earworm with a line from a song by one of my favorite musicians:

…’patchwork like pieces of a heart…’
Patty Larkin, “The Thread of Life”

In an effort to try to be a little bit different and diverse in the offering, I made 3 different patchwork patterns. Two are variations on each other, differing in number of pieces. The smaller number of pieces lends itself to a sort of argyle feel, especially in looking at one of the samples I did, using purple artique and olive green streaky glass. The other two samples in that pattern are with rainbow colors, one randomly placed and one a bit more orderly. Then the more involved patchwork piece came about, offering a lot of potential for random color placement. I did a cool colors sampler, and one in various textures of clear glass. The clear glass piece has garnered a lot of interest, so I expect to be stocking up on more textured glass so I can make a variety of stained glass hearts with the clear textures, randomly arranged so that each finished piece is different. The third patchwork piece is a bit more avant garde. I had a ball planning the colors and layouts of the first sample, but it remains to be seen how popular that one will be with buyers. I may make a couple more samples with different colors and arrangements to see how else it can look.

love-artdecoheart1For the other patterns, I came up with two variations of what I call an inlay heart. After a Facebook post in which I wondered aloud if people would be interested in hearts in glass, several people commented that I should incorporate the wire words that I started to use on the guitars and banjos. So I designed the heart within a heart for one, and another heart shape with a larger open space in its middle, using straight lines to create a pattern within the piece. For the inlay heart, I am going to tweak the pattern to make the outer heart a bit bigger and more full, but I am otherwise pleased with how it turned out. For the heart using straight lines to give it its look, I first went for a cherry red waterglass outer edge, clear glue chip glass for accent, and white for the center. It can certainly be done in just about any color variation depending on what someone wants in their own window.

I am happy with how all of the samples turned out, but also know that a couple of the patterns are likely to be more popular than the rest. Judging by the response on my Facebook glass page, the early ‘leaders’ are the inlay heart-within-a-heart which can host a wire word in the center, and the 15 piece patchwork heart.

Check out the gallery of the first finished stained glass hearts. as I do more variations, I will add photos to it. To order or inquire about any pieces, just contact me.  Thank you!

beloved-inlayheart1 rainbow-patchworkheart1 Blue stained glass heart with clear glass inlaid patchwork heart


Stained Glass Birdhouse Nightlight

It’s been a while since I have really made a new pattern. There’s always something percolating (and a few other things are swirling in the mind right now), which means there is usually a fair amount of incubation from the first thought through to the first sample pieces.

Small stained glass birds in red, yellow, green, and blue.That was not the case with this one, which came together very quickly. My fellow folkie friend, Kat, saw me post on Facebook about adding new colors to the small bird ornaments I make. Previously done only in blue and red, I’m now making them also in yellow and green. As a fan of They Might Be Giants, Kat mentioned that the little blue birds reminded her of one of their songs, Birdhouse In Your Soul. She had gotten a plastic blue bird nightlight some time back, but it had broken, so could I make one of my glass blue birds into a nightlight? Unfamiliar with the song, I went and looked it up. My glass bluebird itself was not, to me, enough to make a decent nightlight, BUT – since a birdhouse also figures into the song prominently, it made perfect sense to build the nightlight with both elements.

All cut out - first samples of a birdhouse nightlight with a small bird.So, I fired up Photoshop and started playing around with creating a properly sized birdhouse pattern that I could use a backdrop. The small bird ornament itself was, luckily, already of a good size to put on the front. With some input from Kat and another artist friend, Suzanne, I settled on the pattern and set out to find the right glass. Having only two sets of nightlight works right now, it necessarily limited how many samples I could make. This is not a bad thing since I tend to think “sample? Let’s make SIX, in different colors!”

I am pleased with how this first round has turned out. I opted for a more opaque blue glass for the bird so that the birdhouse colors behind would not change the color/look. My personal preference in a nightlight is NOT to see the bulb too clearly through the glass when it is lit, so I also like to pick more translucent glass for the parts going right over the bulb. For these first two nightlights, I went with a forest green wispy glass outlined by a dark green transparent glass. I also had a similar purple wispy I used for the center of the other one. with a purple wispy waterglass used for the outer edges of that one. The hole is made with black enamel paint, baked onto the glass.

Purple birdhouse with blue bird, work in progressWhen I get more nightlight works, I am going to play with more color combinations on the birdhouse, and also birds of other colors. While this was inspired by Kat’s mention of the TMBG song, the nice thing about this pattern and piece is that it has great potential for versatility and appeal for anyone who likes birds and birdhouses.

Ultimately, this project came together in about 2 days. I wish all of my new pieces were that easy to get from thought to fruition. Thank you, Kat, for getting the ball rolling!

These will sell for $30 each. They measure about 4.5″ at the widest point, and also 4.5″ at the longest. Want one? Get in touch, and thanks!

greenbirdhs-lr purplebirdhs-lr

Stained Glass Guitar and Banjo Suncatchers

I love music made on guitar and banjo. I’ve been a folkie since I was a kid, growing up listening to John Denver, Judy Collins, and the Clancy Brothers with Tommy Makem. As an adult, my music collection grows on a weekly basis, and earlier this year I started a blog dedicated to highlighting acoustic/folk music, Freelance Folkie.

Wired words finished with black patina to help them stand out against glass.In the glass world earlier this year, I saw some examples that someone had done of writing out words using wire. I was quite intrigued by the idea and kept simmering about it as I considered applications, pieces on which I could use such words. I bought a notebook, started writing out a few examples in cursive (which looks much neater than my usual scrawl I call handwriting), then left the ideas under the radar to see what might develop.

And along it came, that eureka moment when multiple ideas came together. It became a completely sensible notion to make guitars on which I could put wire words.  The notion grew a little more as I decided also to try a banjo. Of course, I can’t make just one or two samples. Over about 4 days, I had recreated a guitar pattern large enough to have words fit decently, created a similarly-sized banjo pattern, and set about to making pieces. When I was done, I had 7 guitars and 2 banjos to get the idea off the page and into reality.

Writing wire words is an engrossing process. It will take some practice to get some letters to look better and better, like the letters p and g, and others with loops in them. The letter t presented its own challenge. I am pleased with how my first efforts turned out, and feel confident that I can continue to refine this skill and make a wide variety of words to fit on these instruments. I had a chance to employ another new technique as well, using enamel paint to make the sound holes on the guitars. This gave me not only some new pieces for my repertoire, but also grew my glass skills, which makes this a successful endeavor in multiple ways.

Examples of guitar and banjo suncatchers with wire embellishmentsI am pleased with the end result, and I hope others enjoy these as well. The guitar measures 7 inches long by about 2.75 inches across at the largest point. The body of the pieces is a lovely amber brown, with transparent dark brown used for the neck and headstock. I played with a few different possibilities for decoration on those two darker pieces, and I welcome feedback for what works or did not. The banjo is made with a wispy white for the body, and also dark brown for the neck and headstock. I did details only on the headstock on these, and I think I actually prefer that look, personally. The body of the banjo is 2.75 inches in diameter, with a total length of about 7.25 inches. All of the pieces are set to hang on about a 40-45 degree angle. The guitars have been finished with a black patina on all but the headstock/neck embellishments. The banjos are in the original silver finish, polished to keep the shine.

Please let me know what you think. Decorations or not on the neck and headstock? What other words would do well on these instruments? I’ll be selling these for $20 each, plus shipping. If you want one, let me know. Check Etsy for listings there, as well. I hope you will consider adding a guitar or banjo to your own window! To see more of the prcess that went into these, and individual photos of the finished pieces, please visit the Stained Glass Guitar and Banjo Suncatcher gallery.

Various guitar and banjo suncatchers with wire words - first group!

Tardis stained glass suncatchers and nightlights

Tardis nightlightThough I have only just started watching Doctor Who, myself, I seem to know a lot of Whovians, and have seen a lot of related merchandise, tchotchkes, etc from the show. One of the most enduing and oft-used icons is the Tardis. This is the vehicle in which they get around, and it seemed easy enough to render in my own stained glass patterns.

My first thought was to offer handmade stained glass Tardis nightlights as I had not really seen that out in the market as much. My motivation was to offer something a bit unique. After soliciting opinions from a few Whovians, I wound up with two patterns and made each. This is the best way for me to figure out what works and what doesn’t in terms of what I feel comfortable making again.

Tardis night lightThe end result is one I will gladly make again, and one I plan to retire. The ‘keeper’ Tardis is a little bit wider and so the long skinny pieces are easier to cut and maintain an essentially straight edge (harder than it sounds with the grinder). It also allows for two versions, with sides (pictured, above) and without. Because of considerations for weight of the glass on the night light works, the smaller size of these projects really makes a difference for the two patterns.

The front panel of the ‘keeper’ night light measures about 3.5″ wide and, including the light on top, 4.75″ tall. The side panels are each about 1.3″ wide and about 4.5″ tall. It costs $45 as seen, $35 without the sides, plus shipping.

And then, I also decided to make a couple of Tardis suncatchers. First, not everyone wants, needs, or likes night lights. Making a suncatcher additionally means I can make the pattern a little bigger, which makes the skinnier Tardis a lot more comfortable to make. So here I present two Tardis suncatchers, both available for order. The one on the left is just under 6″ long (including the light) and 3.75″ wide. The one on the right is just over 6″ long and about 3.5″ wide. Each is $30 plus shipping. Hanging chain and a suction cup are included with each suncatcher.

bothtardissun

You can see a few more photos in the Tardis gallery. And if you would like to order one, don’t hesitate to get in touch. Thanks!