Stained Glass Butterfly Ornaments

Lots of new little butterflies awaiting construction.Up here in the northeast region of the United States, it’s been a particularly long and brutal winter. Cold has been ceaselessly relentless, and the snow depth has reached record levels in some places. After a while, cabin fever and dreams of spring become completely dominating. This year, that meant I started thinking about new, bright pieces to bring back some color. My thoughts turned to the butterfly, and I decided to make up patterns and pieces for stained glass butterfly ornaments.

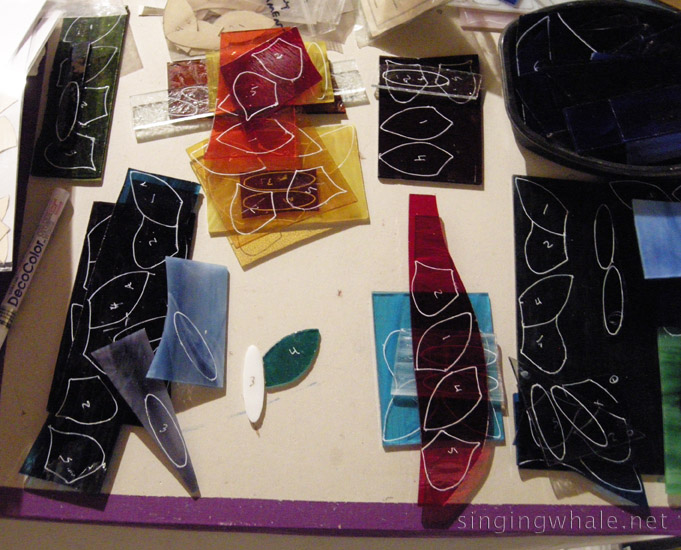
I am doing a brand new event on March 21, Zing into Spring event in New London NH, created by Kearsarge Magazine, so I have been working on making some glass for that day (in addition to many glass hearts!). I started thinking about butterflies which could be a little smaller, both in terms of piece size and to have a less expensive take away item. I started fiddling around with drawing butterfly wings in photoshop, consulting the almighty Google image search to look at actual butterfly wings for comparison and inspiration. After a little trial and error, new lines and lots of erasing, I landed on a pattern.

Red/orange/yellow butterfly cut and foiled, about to be soldered together.Because I don’t do any new pattern simply, as usual it was not enough to make just one or two to start. I went through my scrap glass collection (as well as a little of the regular glass stock) and wound up with 18 new little butterflies.

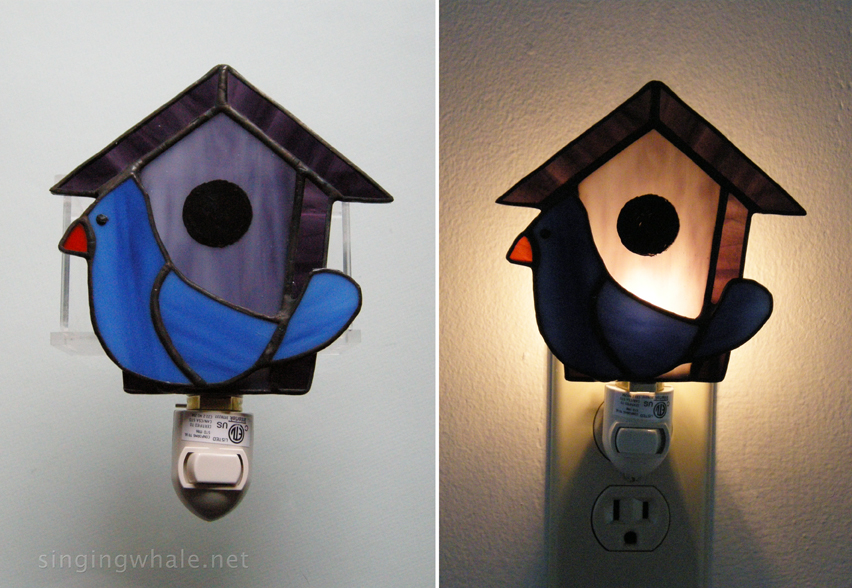
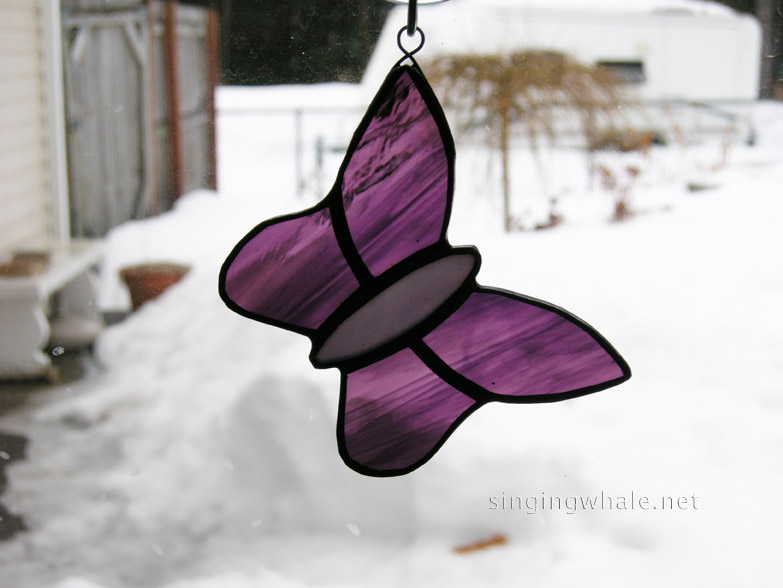
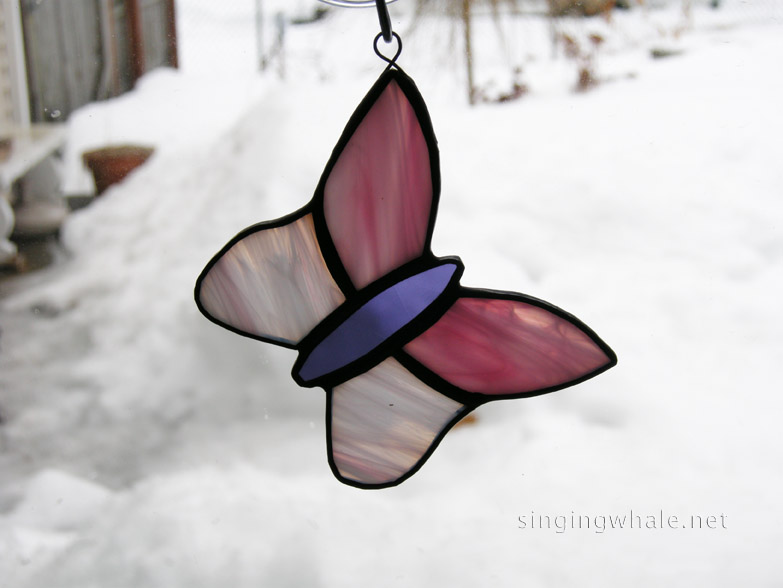
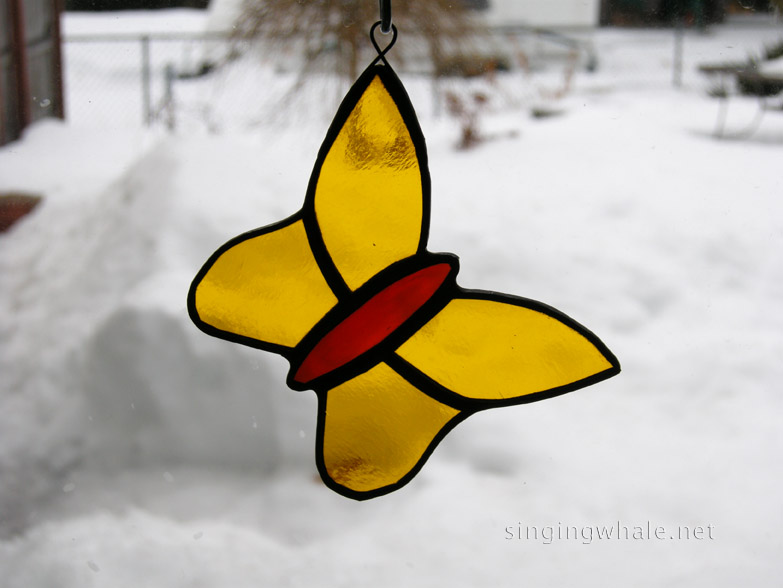
The end result is a lovely stained glass butterfly ornament for any window, or even on a Christmas tree at that time of year. It measures 3.25″ across and 2.75″ high. A hanging hook is securely attached so that the butterfly hangs on an angle. They are made with the copper foil method, and the seams are finished with black patina. The color combinations are practically limitless and I think this is going to be a fun piece to make. I am offering them for $10 each, plus postage where applicable (ie not at a show). I’ve posted a gallery of the first butterfly ornaments to show some of the potential ranges. Please feel free to contact me with any questions or special color requests. After the Zing into Spring event, I expect I will be putting some of these up on Etsy as well.

And if you are free on March 21 and able to get to New London NH, please stop by Zing into Spring. There is a lot of great stuff in store with vendors, classes, demonstrations, and more!

purplewispy wispypink yellow-redamber

Stained Glass Hearts

After a wonderfully busy holiday season, my mind started to turn towards thinking about what next to add to my catalog to start off 2015. With Valentine’s Day, on the near horizon, I started contemplating stained glass hearts and roses.

Roses may still yet come once I get some photos from which I can play with making patterns. Hearts, on the other hand, were easy to get started right on my computer. First, I spent a full day looking at other stained glass hearts on the internet to see how other people were rendering them. My goal is always to be mindful of other people’s work so that I can create something that is more my own, unique and different from other work out there.

Stained glass heart in a patchwork pattern, made with cool colorsAnd because I am not one to do a simple ‘one pattern, one sample’ approach, by the time I was finished playing around with patterns and ideas, I had 5 patterns to try out (and a couple more which are still simmering…). Then I went to pull out some glass to make samples, and those 5 patterns turned into 9 samples. This also, with some of the patterns, resulted in an earworm with a line from a song by one of my favorite musicians:

…’patchwork like pieces of a heart…’
Patty Larkin, “The Thread of Life”

In an effort to try to be a little bit different and diverse in the offering, I made 3 different patchwork patterns. Two are variations on each other, differing in number of pieces. The smaller number of pieces lends itself to a sort of argyle feel, especially in looking at one of the samples I did, using purple artique and olive green streaky glass. The other two samples in that pattern are with rainbow colors, one randomly placed and one a bit more orderly. Then the more involved patchwork piece came about, offering a lot of potential for random color placement. I did a cool colors sampler, and one in various textures of clear glass. The clear glass piece has garnered a lot of interest, so I expect to be stocking up on more textured glass so I can make a variety of stained glass hearts with the clear textures, randomly arranged so that each finished piece is different. The third patchwork piece is a bit more avant garde. I had a ball planning the colors and layouts of the first sample, but it remains to be seen how popular that one will be with buyers. I may make a couple more samples with different colors and arrangements to see how else it can look.

love-artdecoheart1For the other patterns, I came up with two variations of what I call an inlay heart. After a Facebook post in which I wondered aloud if people would be interested in hearts in glass, several people commented that I should incorporate the wire words that I started to use on the guitars and banjos. So I designed the heart within a heart for one, and another heart shape with a larger open space in its middle, using straight lines to create a pattern within the piece. For the inlay heart, I am going to tweak the pattern to make the outer heart a bit bigger and more full, but I am otherwise pleased with how it turned out. For the heart using straight lines to give it its look, I first went for a cherry red waterglass outer edge, clear glue chip glass for accent, and white for the center. It can certainly be done in just about any color variation depending on what someone wants in their own window.

I am happy with how all of the samples turned out, but also know that a couple of the patterns are likely to be more popular than the rest. Judging by the response on my Facebook glass page, the early ‘leaders’ are the inlay heart-within-a-heart which can host a wire word in the center, and the 15 piece patchwork heart.

Check out the gallery of the first finished stained glass hearts. as I do more variations, I will add photos to it. To order or inquire about any pieces, just contact me.  Thank you!

beloved-inlayheart1 rainbow-patchworkheart1 Blue stained glass heart with clear glass inlaid patchwork heart


Stained Glass Birdhouse Nightlight

It’s been a while since I have really made a new pattern. There’s always something percolating (and a few other things are swirling in the mind right now), which means there is usually a fair amount of incubation from the first thought through to the first sample pieces.

Small stained glass birds in red, yellow, green, and blue.That was not the case with this one, which came together very quickly. My fellow folkie friend, Kat, saw me post on Facebook about adding new colors to the small bird ornaments I make. Previously done only in blue and red, I’m now making them also in yellow and green. As a fan of They Might Be Giants, Kat mentioned that the little blue birds reminded her of one of their songs, Birdhouse In Your Soul. She had gotten a plastic blue bird nightlight some time back, but it had broken, so could I make one of my glass blue birds into a nightlight? Unfamiliar with the song, I went and looked it up. My glass bluebird itself was not, to me, enough to make a decent nightlight, BUT – since a birdhouse also figures into the song prominently, it made perfect sense to build the nightlight with both elements.

All cut out - first samples of a birdhouse nightlight with a small bird.So, I fired up Photoshop and started playing around with creating a properly sized birdhouse pattern that I could use a backdrop. The small bird ornament itself was, luckily, already of a good size to put on the front. With some input from Kat and another artist friend, Suzanne, I settled on the pattern and set out to find the right glass. Having only two sets of nightlight works right now, it necessarily limited how many samples I could make. This is not a bad thing since I tend to think “sample? Let’s make SIX, in different colors!”

I am pleased with how this first round has turned out. I opted for a more opaque blue glass for the bird so that the birdhouse colors behind would not change the color/look. My personal preference in a nightlight is NOT to see the bulb too clearly through the glass when it is lit, so I also like to pick more translucent glass for the parts going right over the bulb. For these first two nightlights, I went with a forest green wispy glass outlined by a dark green transparent glass. I also had a similar purple wispy I used for the center of the other one. with a purple wispy waterglass used for the outer edges of that one. The hole is made with black enamel paint, baked onto the glass.

Purple birdhouse with blue bird, work in progressWhen I get more nightlight works, I am going to play with more color combinations on the birdhouse, and also birds of other colors. While this was inspired by Kat’s mention of the TMBG song, the nice thing about this pattern and piece is that it has great potential for versatility and appeal for anyone who likes birds and birdhouses.

Ultimately, this project came together in about 2 days. I wish all of my new pieces were that easy to get from thought to fruition. Thank you, Kat, for getting the ball rolling!

These will sell for $30 each. They measure about 4.5″ at the widest point, and also 4.5″ at the longest. Want one? Get in touch, and thanks!

greenbirdhs-lr purplebirdhs-lr

Stained Glass Guitar and Banjo Suncatchers

I love music made on guitar and banjo. I’ve been a folkie since I was a kid, growing up listening to John Denver, Judy Collins, and the Clancy Brothers with Tommy Makem. As an adult, my music collection grows on a weekly basis, and earlier this year I started a blog dedicated to highlighting acoustic/folk music, Freelance Folkie.

Wired words finished with black patina to help them stand out against glass.In the glass world earlier this year, I saw some examples that someone had done of writing out words using wire. I was quite intrigued by the idea and kept simmering about it as I considered applications, pieces on which I could use such words. I bought a notebook, started writing out a few examples in cursive (which looks much neater than my usual scrawl I call handwriting), then left the ideas under the radar to see what might develop.

And along it came, that eureka moment when multiple ideas came together. It became a completely sensible notion to make guitars on which I could put wire words.  The notion grew a little more as I decided also to try a banjo. Of course, I can’t make just one or two samples. Over about 4 days, I had recreated a guitar pattern large enough to have words fit decently, created a similarly-sized banjo pattern, and set about to making pieces. When I was done, I had 7 guitars and 2 banjos to get the idea off the page and into reality.

Writing wire words is an engrossing process. It will take some practice to get some letters to look better and better, like the letters p and g, and others with loops in them. The letter t presented its own challenge. I am pleased with how my first efforts turned out, and feel confident that I can continue to refine this skill and make a wide variety of words to fit on these instruments. I had a chance to employ another new technique as well, using enamel paint to make the sound holes on the guitars. This gave me not only some new pieces for my repertoire, but also grew my glass skills, which makes this a successful endeavor in multiple ways.

Examples of guitar and banjo suncatchers with wire embellishmentsI am pleased with the end result, and I hope others enjoy these as well. The guitar measures 7 inches long by about 2.75 inches across at the largest point. The body of the pieces is a lovely amber brown, with transparent dark brown used for the neck and headstock. I played with a few different possibilities for decoration on those two darker pieces, and I welcome feedback for what works or did not. The banjo is made with a wispy white for the body, and also dark brown for the neck and headstock. I did details only on the headstock on these, and I think I actually prefer that look, personally. The body of the banjo is 2.75 inches in diameter, with a total length of about 7.25 inches. All of the pieces are set to hang on about a 40-45 degree angle. The guitars have been finished with a black patina on all but the headstock/neck embellishments. The banjos are in the original silver finish, polished to keep the shine.

Please let me know what you think. Decorations or not on the neck and headstock? What other words would do well on these instruments? I’ll be selling these for $20 each, plus shipping. If you want one, let me know. Check Etsy for listings there, as well. I hope you will consider adding a guitar or banjo to your own window! To see more of the prcess that went into these, and individual photos of the finished pieces, please visit the Stained Glass Guitar and Banjo Suncatcher gallery.

Various guitar and banjo suncatchers with wire words - first group!

Stained Glass God’s Eye, Ojo de Dios

Recently I started thinking about adding something to my catalog that might be appealing to religious folks. I wanted to do something a little bit different from what I have seen from others, just to stand out a little bit. My first thought was a symbol popularly known as a God’s eye. Like probably millions of kids, I had made at least one out of yarn and popsicle sticks when I was younger. Somehow, it has always stuck with me, despite not being especially religious, myself.

Stained glass god's eye ornament
Small God’s eye ornament in red and yellow.

Next, I did what any nerd would do, I Googled it. I discovered that there are not many representations of it in stained glass. And I learned that it has a much deeper history than I had ever realized. It is not a Christian symbol in its origin, but instead hails from the Huichol Indians of Mexico, a tribe originating and residing in the Sierra Madre Occidental Mountains of central northwest Mexico. Their spiritual tradition is nature-based and polytheistic. In a conversation with the head of The Huichol Center for Cultural Survival, I was told that the God’s eye symbol, also called Ojo de Dios, has been incorporated into many belief systems around the world.

Learning as much as I did about the symbol, I felt increasingly drawn to it and felt challenged to make a faithful and respectful representation of it. The four points represent the basic elements of earth, air, fire, and water. The eye is meant to offer protection, especially for children, as well as a connection to the power and mystery of the unknown. The connections that the Huicholes have to the land and sea resonate deeply with me as someone who also is concerned about and interested in our planet.

Small God's eye ornament, with two shades of purple glass
Small God’s eye ornament, with two shades of purple glass

In typical fashion, one sample is not enough so I created two patterns and six pieces. One pattern is a ‘full size’ sun catcher at about 6 1/4″ in diameter, and with three layers. I also made a smaller, ornament-sized version with just two layers which measures 3 1/2″ across. Each hangs from a hook. As it turned out, I had some terrific glass choices for the first samples of the larger sun catchers. I use a lot of wispy glass in many pieces, meaning a single color of glass with white lightly swirled throughout. Very commonly, the edges of those sheets of glass have the primary color and white together in a straight pattern. I realized that this mimicked the texture of some yarns. Since so many God’s eye pieces are created in yarn, this seemed a great way to start these first pieces. I am pleased with how those turned out, and will be looking out for more such glass as much as I can, and use other colors/textures in the meantime.

God's eye stained glass, Ojo de Dios stained glass
First samples of the God’s eye/Ojo de Dios pattern. This is the larger version, at 6 1/4″ across.

The larger God’s eye is $30, and the ornament size is $15. Please let me know what you think, and thanks for reading!

In light pink and white, small God's eye/Ojo de Dios ornament
In light pink and white, small God’s eye/Ojo de Dios ornament

To learn more about the Huichol people, here are a few more links for information: The Huichol Center for Cultural SurvivalHuichol – Cultural Survival | The Sacred Land of the Huichols

Stained Glass Owls, and Flying Owl Stained Glass Nightlights

It is an ongoing process for me to try and develop my own owl patterns. For one thing, most of the ‘stock’ or free patterns of owls strike me as being either cartoonish or mean looking. Plus, I really want something of my own, something unique to put out there. Given that freehand drawing is not my strong suit (there’s a reason that many of my patterns start as photographs), this would be a challenge. I have spent hours searching for and looking at owl photos of various species to get some ideas, playing around in Photoshop with line drawings. Nothing was quite coming together.

stained glass owls
First owls made, first generation of eyes. trying various things to see what options work best.

And then one day, in a flash from some mysterious muse, I got an idea for a simple but recognizable owl face. I managed to create/draw a pattern in Photoshop for it. It’s not perfectly symmetrical but I actually like that about it. That adds a little bit of a sense of whimsy and uniqueness. I did the pattern in two sizes, a small and large, thinking the smaller size would be good as an ornament, especially. These faces, I made back in December and just realized I had not posted about them yet. The larger owl measure 4.5″ wide by 3.5″ tall. The smaller owl is 3.5″ wide by 2.5″ tall.

I’ve been experimenting with eyes, somewhat, securely gluing various materials and pieces into place because adding eyes *in* glass results in a lot more pieces, seams, and work, where the idea here was to be simple and recognizable. So I am using googly eyes on some, and flat washers with the pupils of googly eyes that I have cut free on others, and some small globs for the smaller owls. I think the washers combination will be the predominant way I will do eyes going forward but I may still use googly eyes when I am in a silly mood or they are requested.

The owl on the left has brass washers for eyes, and the one on the right has zinc washers.

From the creation of this owl face pattern, I recently had an idea to grow it into a unique nightlight pattern. Searches for glass owl nightlights turned up nothing along these lines so I was off and running. The goal was to create wings for the sides of the nightlight, creating the sense of flight. The small owl face from the previous design round was a good size to fit on the base. I modified the center piece of a standard night light backs patterns to allow for a better attachment of the face to the back and keep it securely joined. And then I developed a wing pattern to go on each side. The first two samples I made are a snowy/white owl and a brown owl. I am really pleased at how these turned out! I’ve since made a red and pink one by request and am looking forward to seeing what other color combinations I can try out. The glass on the nightlight is 6.25″ wide by 3.75″ tall (height does not include the night light base. With that, height is 5.75″).

Prices as of this posting (subject to change in the future – current prices will always be listed with photos in the gallery): small owl face, $10. Larger owl face, $15. Flying owl stained glass nightlight is $40. Shipping additional in all cases.

Perhaps more and different owls will also come along someday!

First two flying owl stained glass night lights, for a white/snowy owl and a brown owl.

Tardis stained glass suncatchers and nightlights

Tardis nightlightThough I have only just started watching Doctor Who, myself, I seem to know a lot of Whovians, and have seen a lot of related merchandise, tchotchkes, etc from the show. One of the most enduing and oft-used icons is the Tardis. This is the vehicle in which they get around, and it seemed easy enough to render in my own stained glass patterns.

My first thought was to offer handmade stained glass Tardis nightlights as I had not really seen that out in the market as much. My motivation was to offer something a bit unique. After soliciting opinions from a few Whovians, I wound up with two patterns and made each. This is the best way for me to figure out what works and what doesn’t in terms of what I feel comfortable making again.

Tardis night lightThe end result is one I will gladly make again, and one I plan to retire. The ‘keeper’ Tardis is a little bit wider and so the long skinny pieces are easier to cut and maintain an essentially straight edge (harder than it sounds with the grinder). It also allows for two versions, with sides (pictured, above) and without. Because of considerations for weight of the glass on the night light works, the smaller size of these projects really makes a difference for the two patterns.

The front panel of the ‘keeper’ night light measures about 3.5″ wide and, including the light on top, 4.75″ tall. The side panels are each about 1.3″ wide and about 4.5″ tall. It costs $45 as seen, $35 without the sides, plus shipping.

And then, I also decided to make a couple of Tardis suncatchers. First, not everyone wants, needs, or likes night lights. Making a suncatcher additionally means I can make the pattern a little bigger, which makes the skinnier Tardis a lot more comfortable to make. So here I present two Tardis suncatchers, both available for order. The one on the left is just under 6″ long (including the light) and 3.75″ wide. The one on the right is just over 6″ long and about 3.5″ wide. Each is $30 plus shipping. Hanging chain and a suction cup are included with each suncatcher.

bothtardissun

You can see a few more photos in the Tardis gallery. And if you would like to order one, don’t hesitate to get in touch. Thanks!

Stained Glass Striped Fish

Striped fish in blue and yellow wispy glassFor one week each summer, I teach stained glass at a placed called ‘Camp’ Camp. It’s a great deal of fun to watch people who have never done stained glass before come in and make themselves something to take home (and Camp itself is just a blast in general). After this past summer (August 2013), one of my new students who is also an artist decided to start drawing some patterns and then sent me some to use. This striped fish is the first one of those I have made. I have great appreciation for KCJ’s willingness to share her ideas so I can offer more pieces.

What I love about this striped fish is its blend of realism and whimsy. It’s simple and yet has potential for so many color choices and textures. Measuring 4.75 inches wide by 4 inches tall, it’s perfect for any small window. In fact, you could get a whole school of them to fill up a larger window!

Visit the gallery to see the initial school of striped fish. You’ll find a blend of blues, green, yellow, purple orange… endless possibilities! Sometimes it can be a real challenge to come up with color combinations, especially for new patterns, but this one is easy. I am looking forward to seeing what other color and texture combinations I can use as well, and creating a whole ocean full of color.

Enjoy, and let me know what colors you would like to see!

Stained glass striped fish in three different color selections


Stained Glass Dragonflies

There’s no particular reason why I have not done stained glass dragonflies before, but I have gotten many requests for them. So I finally worked up a pattern and made my first samples this week.

pink dragonflyThe fun part about working up any new pieces is playing with glass colors and textures. I sat down to make one or two pieces, but when I started to pull out glass, I wound up with 10 by the time I was done. After consulting the all knowing Google Images to see the impressive variety of colors in which real dragonflies appear, it was easy to keep growing the pile of glass I could use. And I am already thinking of new glass to buy which can also make for beautiful new pieces!

A couple of months back, when I was picking up some other supplies at the glass shop I most often frequent (Detailed Stained Glass in Concord NH), I found that they also had a neat translucent white glass which just screamed “dragonfly wings”. It’s Spectrum’s  Firelight Krinkle (according to the sticker on the glass) for anyone curious. I started out with the plan to use that glass for wings. As I pulled more transparent colored glass for the bodies, though, the white seemed too strong, so I also looked at clear glass possibilities. Wound up using some clear glue chip, hammered, and clear satin textures.

red/orange stained glass dragonflyThe other aspect I was keen to explore was the notion of eyes. Because I’ve also started making cat faces (which will be covered in another post along with some other new patterns), I have been stocking up some smaller globs. I was most intrigued by the clear ones with either yellow or red cat’s eye style irises in them. Not all of the samples have eyes as I don’t have small globs in all colors. Decided to also do a few dragonflies with a ‘regular’ head, just to see how it would feel to cut those, and how the finished pieces would look. I like both styles!

The end result is a variety of glass colors and textures used to try out a couple of variations of the pattern for stained glass dragonflies. They are 6.25″ wide and 5.25″ long. Talk a walk through the stained glass dragonfly gallery and tell me – what do you think? I’m also happy to make custom dragonflies with the colors of your choice.

blue stained glass dragonfly